EXIT ALLIANCE REALTY
Pokemon Go! A Beginner's Guide
Shawn Sorensen
Pokemon Go - Beginners Guide
First off, welcome to the wonderful world of Pokemon Go. This app is extremely unique and with enough patience, a lot of fun. That being said the game doesn’t explain everything to new players, and there’s a few tips that you’re going to want to know, and this applies to new players, and seasoned veterans.
Table of Contents
Click these Links to be taken to that section of the article
How to Start
After you make your account you’ll be greeted by a professor who will give you a barebones tutorial on how to find and catch Pokemon. At this point you’ll pick your starter. For the most part, this doesn’t matter, so pick your favorite! Bulbasaur, Charmander and Squirtle are equally awesome, and if you walk for a little while you can even catch a Pikachu! But again, the decision does not impact the game much.
Once you’re through the tutorial the game kind of leaves you without any help, there is a tip icon in the settings but not much after that. So here is my comprehensive tutorial for the game.
Basics and Lingo
Pokemon Go is an augmented reality app that uses your phones GPS, Camera and Data to find virtual Pokemon.
For the most part, the app requires the player to walk around in order to find Pokemon, Pokestops and Gyms. There are various ways to play Pokemon Go, but the goal is of course to catch them all.
The verbage of the game could be a little confusing to players unfamiliar with the series or the app itself, here are some of the basics.
AR: Augmented-reality. This term refers to the feature that allows pokemon to "appear" in real life.
CP: This is the power of the pokemon. The higher it is, the stronger the pokemon.
Pokestop: This is how the player can get items in the game. Approach the pokestop, tap it, and spin the circle to receive Pokeballs, berries, and more! These stops refresh in random intervals, usually between 2-5 minutes. Click here for more information.
Gym: Gyms allow players to battle different teams and claim territory. Taking the gym allows the player to get EXP and if they manage to hold the gym 10 Pokecoins. Click here for more information.
Pokecoins: The premium currency of the game. These coins can be bought in bulk or earned from holding gyms. Then they can be used to buy items. Most of the items can be found at in game pokestops, or from leveling up.
Level: As you level up you can find rarer pokemon, different items, and higher CP pokemon. There are various milestones in levels but the most important is Level 5. At this point you can claim a team and battle gyms (although it is recommended you wait until you are around level 15 or higher).
Menus and Icons
The UI or User Interface for Pokemon Go is simplistic and lacks clutter, which is a positive and a negative for the app. It looks clean, but without labels things can get a little confusing.
Home Screen
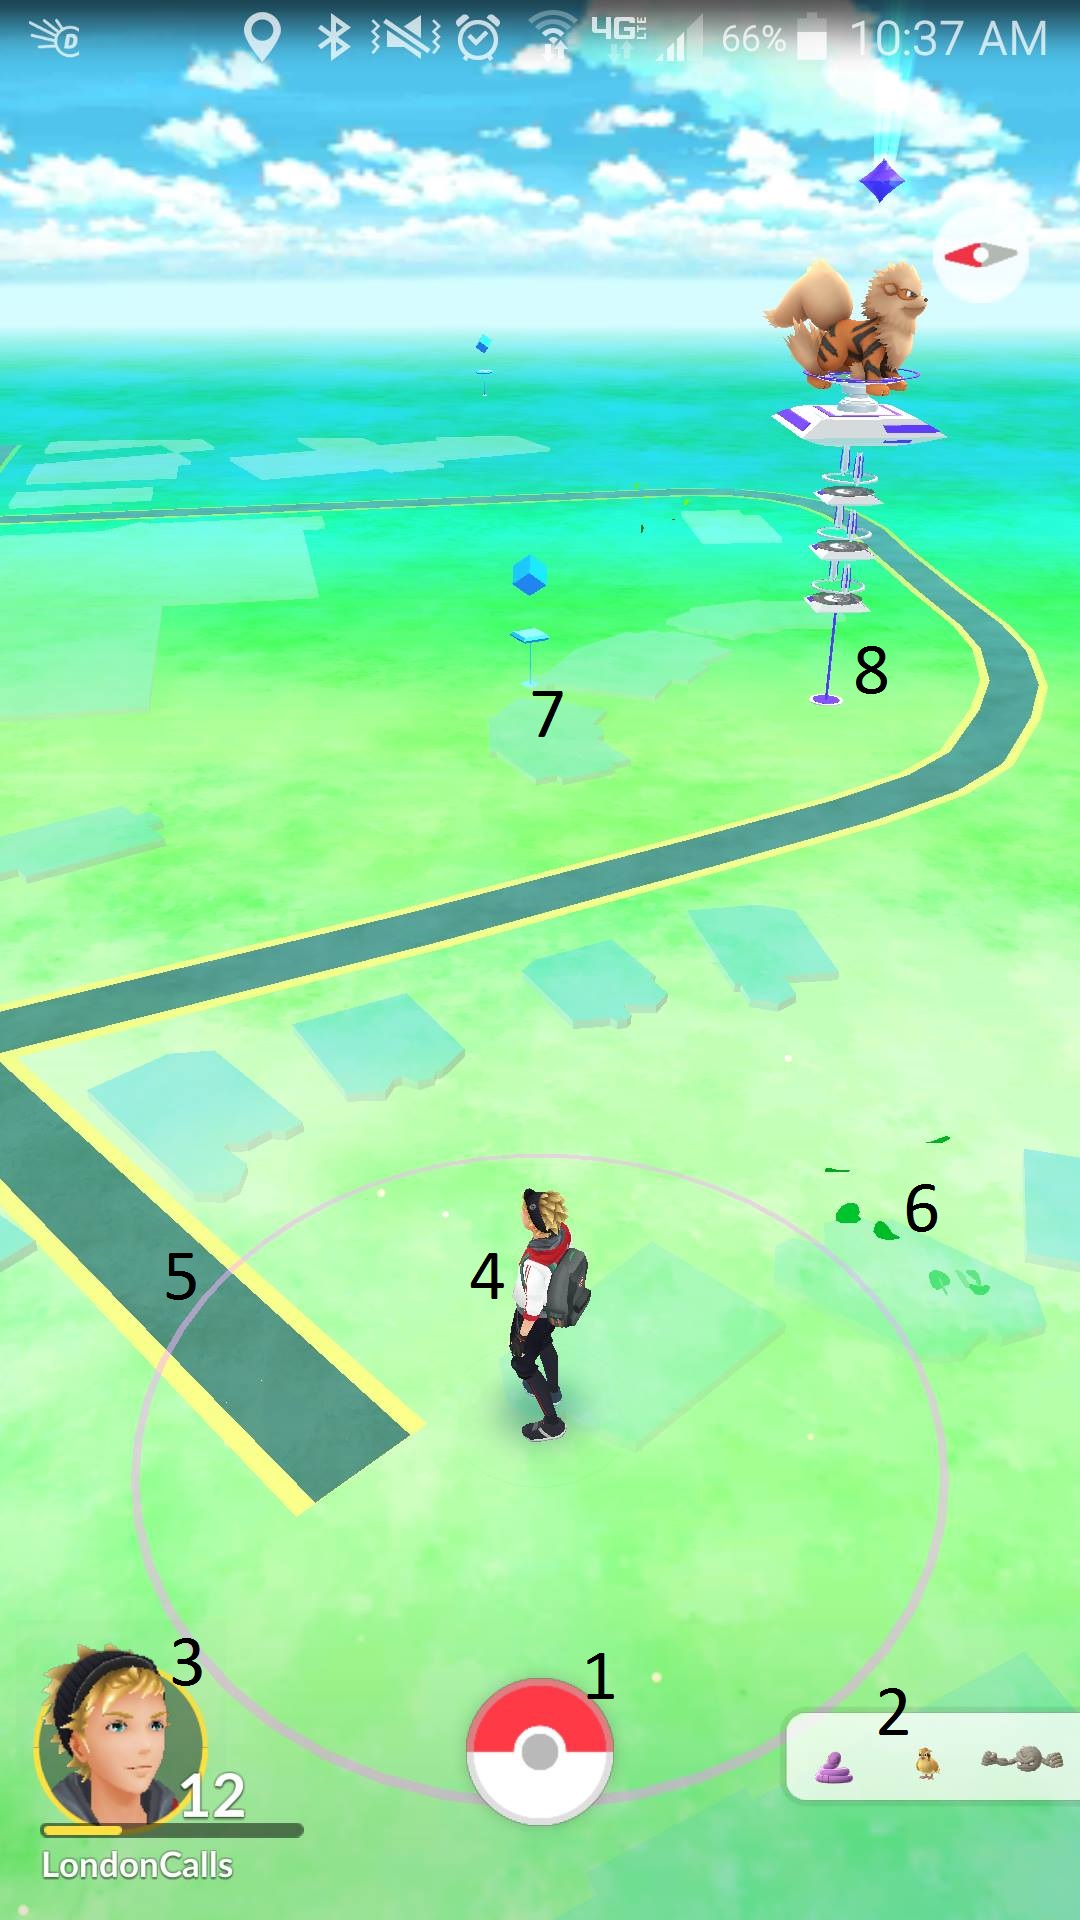
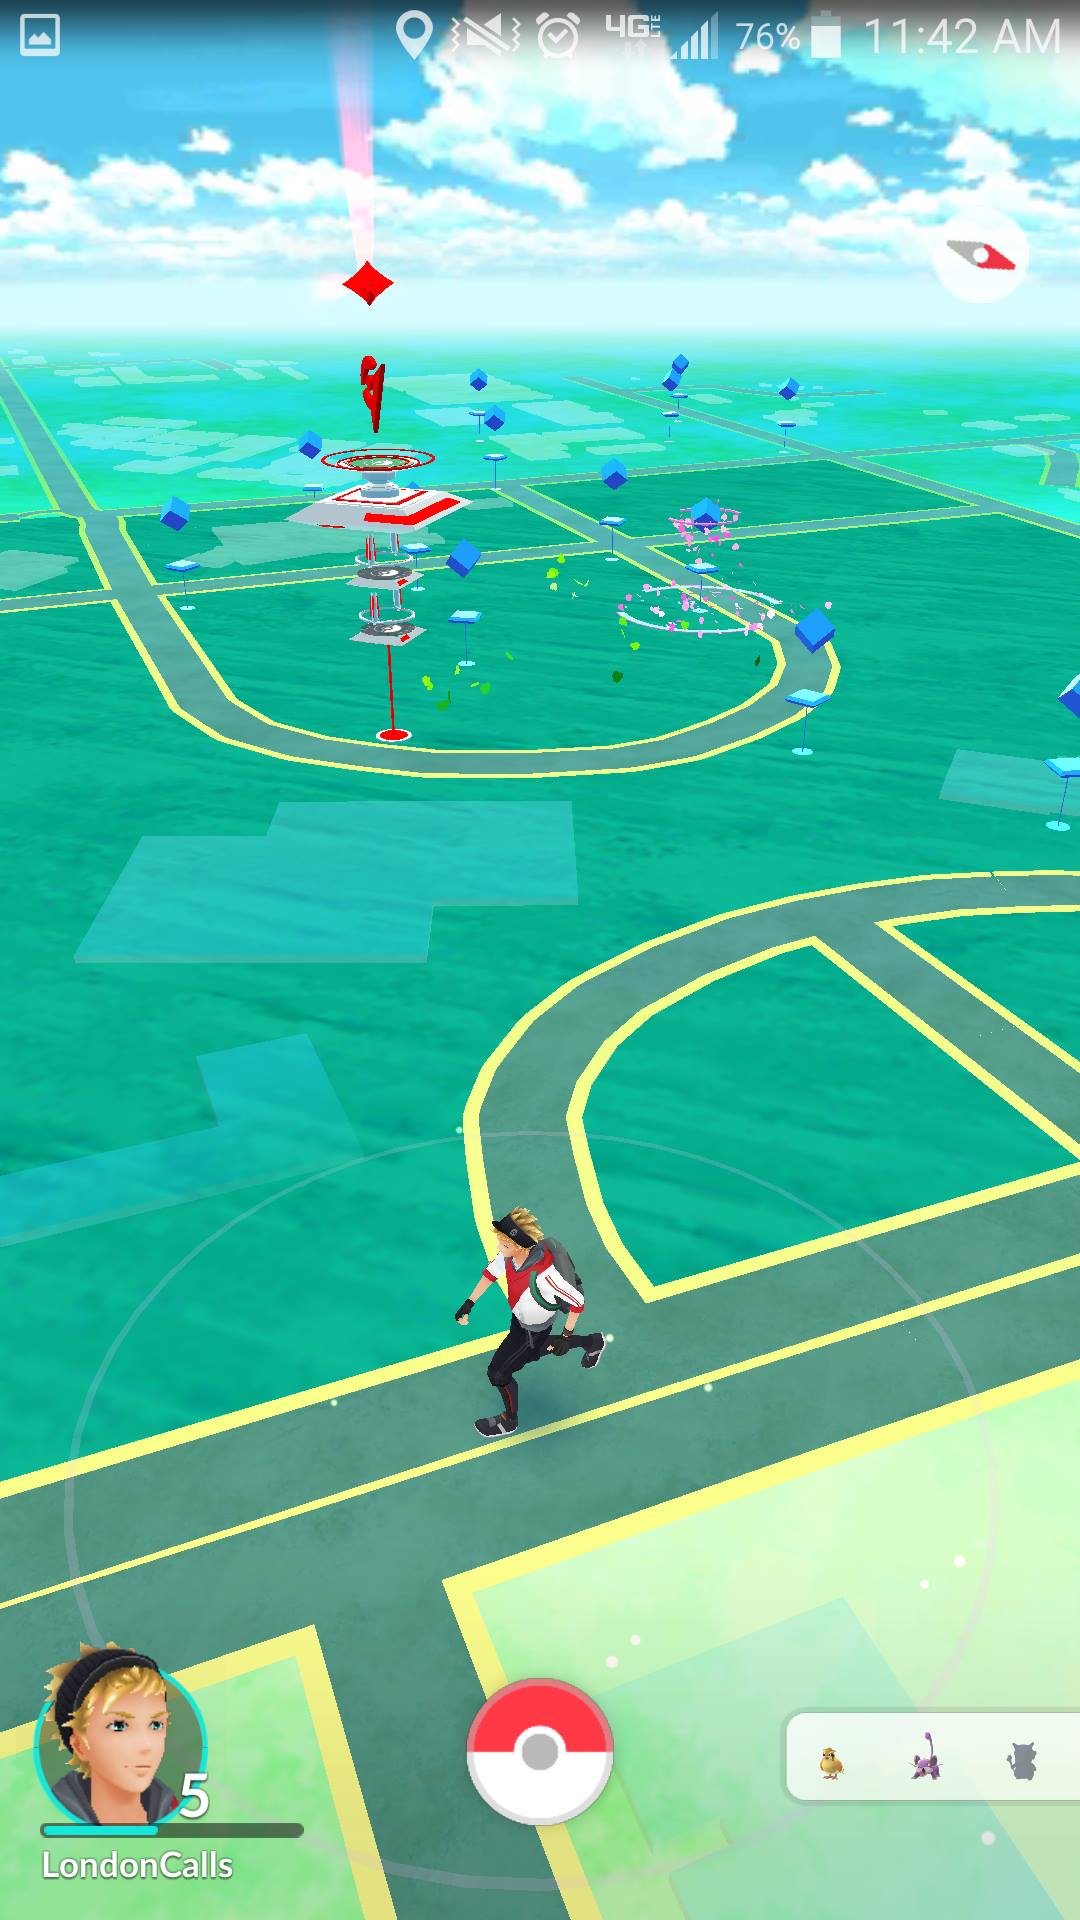
This is the screen you should see after logging in and completing the tutorial, there are several labels on here to help make navigating this tutorial easier.
Most notably you'll notice that this app is basically Google Maps, which makes sense, as that is where Niantic gets their data. You'll be able to see buildings, roads, parks, rivers, and lakes with this app, but it is not to be used for navigation.
Label 1: This Pokeball is how you access your main menu, which allows you to access most of the features within this app. Click here for more information about this part of the game.
Label 2: This small rectangle will show you nearby pokemon, opening it will give more information. Click here for an explanation of that feature.
Label 3: This is your profile. It'll show your avatar's head, your EXP and Level and your username. The color of your EXP bar depicts your team based on what color it is, but more on that later. To see more information about this menu click here.
Label 4: This is your avatar, it tracks your location and should essentially move when you move.
Label 5: This ring pulses out from your character anything within that ring is something you can interact with. This is what determines if you're close to Pokestops, Gyms and is where Pokemon will spawn.
Label 6: Tufts of grass will often spring up from them ground. It is assumed that this is a potential location for a Pokemon, but walking towards this tuft does not always spawn a Pokemon. It just seems to be a destination worth checking out when hunting for Pokemon.
Label 7: This is a Pokestop! One of the most important objects in Pokemon Go. Approach one of these and the cube will transform into a spinning circle. When it does you can tap the Pokestop, which should open up a picture of a nearby landmark or piece of art. Slide your finger across that picture and it should produce items. Click here to learn more about items. Pokestops are the most important thing to look out for when playing the game. Sticking near a large number of these is the best way to "farm" for items and catch plenty of Pokemon.
Label 8: This is a gym. You cannot do anything with a gym until you reach level 5. Once Level 5 you have the ability to pick your team: Valor, Mystic and Instinct. This is not only a cosmetic choice, as whichever team you're on determines how you can interact with Gyms. For the most part you shouldn't worry about Gyms until you have a couple of high CP Pokemon (preferably above a CP of 1,000).
Essentially each Gym is owned by a team, which you can tell by the color. If your team owns the gym you can "spar" with the Pokemon there to raise the gym's prestige level and gain some EXP. The higher the gym's level the more Pokemon you can store there.
Loading Icon

If you see this image in the top left corner of your screen, this means your game is loading. When you see this image don't over tap on your screen or do anything really. Generally you'll want to wait when you see this image, but you can click Pokemon or Pokestops, and depending on your phone the app might eventually begin the encounter or pull up the Pokestop menu.
Nearby Pokemon

This menu is accessed by clicking the small grey box in the bottom right of your device when you're on the map screen/home screen. Pulling this up will show you which Pokemon are within 300 meters (there aren't many sources that can confirm this number). The number of Footprints under the Pokemon is meant to show how close a Pokemon is, 1 means within 100 meters, 2 means 200 meters, 3 means 300 meters. If there are no footsteps under a Pokemon, tapping that Pokemon should make it appear nearby, but it may require some walking. Clicking a Pokemon with 1 footprint or more will allow you to watch the map and the number of footsteps at the same time. Essentially this is a game of "Hot and Cold," if you walk in a direction and the footsteps get higher, you're going the wrong way, and vice versa.
Main Menu
By clicking the Pokeball a variety of menu options appear, and for the most part they're self explanatory.
The Pokemon tab on the left will show you all the Pokemon you've caught and allow you to incubate eggs if you swipe to the left.
The Shop brings you to a menu that allows you to spend Pokecoins to buy in game items, you can also purchase premium currency for real money. It's important to note that if you hold a Gym you can click the shield in the top left to get 10 Pokecoins every 22 hours.
The Pokedex option will show you every individual Pokemon you've caught.
The Items tab will show you all the items you've collected from leveling up or from Pokestops. Each item has a small description explaining what they do and for the most part they are self explanatory.
Trainer Card
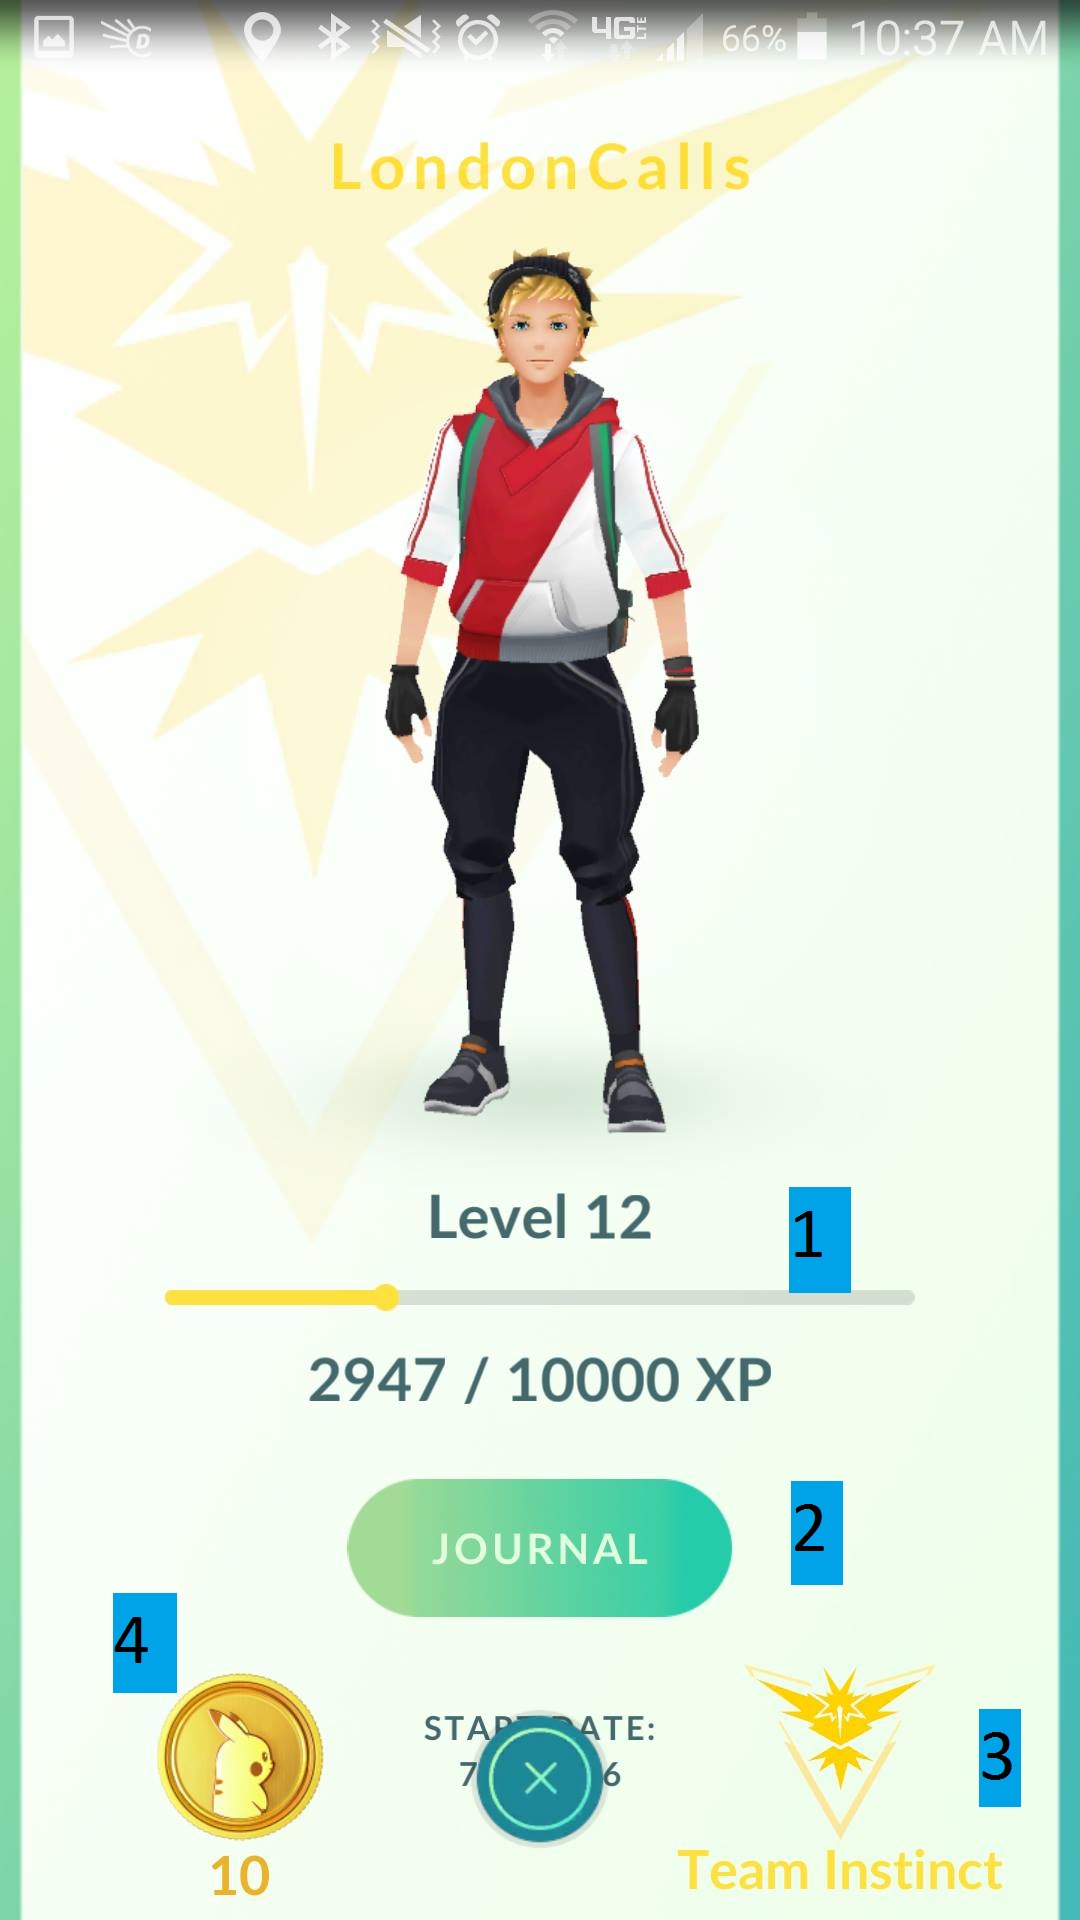
By tapping your avatar's face in the bottom left corner, you can pull up a menu that has a few simple uses. There are a few labels to make it easier to describe.
Label 1: This is your XP, or experience points or EXP, by filling this bar (you gain exp by catching Pokemon, evolving pokemon, battling a gym or using a pokestop) you will level up.
Label 2: The Journal will show you a log of all your previous encounters with Pokestops and Pokemon.
Label 3: This will show you which team your account is on.
Label 4: This is how much premium currency you have. Click it to bring you to the shop.
If you scroll down on this tab you can find all of the medals you've gotten. Medals give you an EXP bonus, depending on how you play you can get a lot of medals very quickly.
Settings
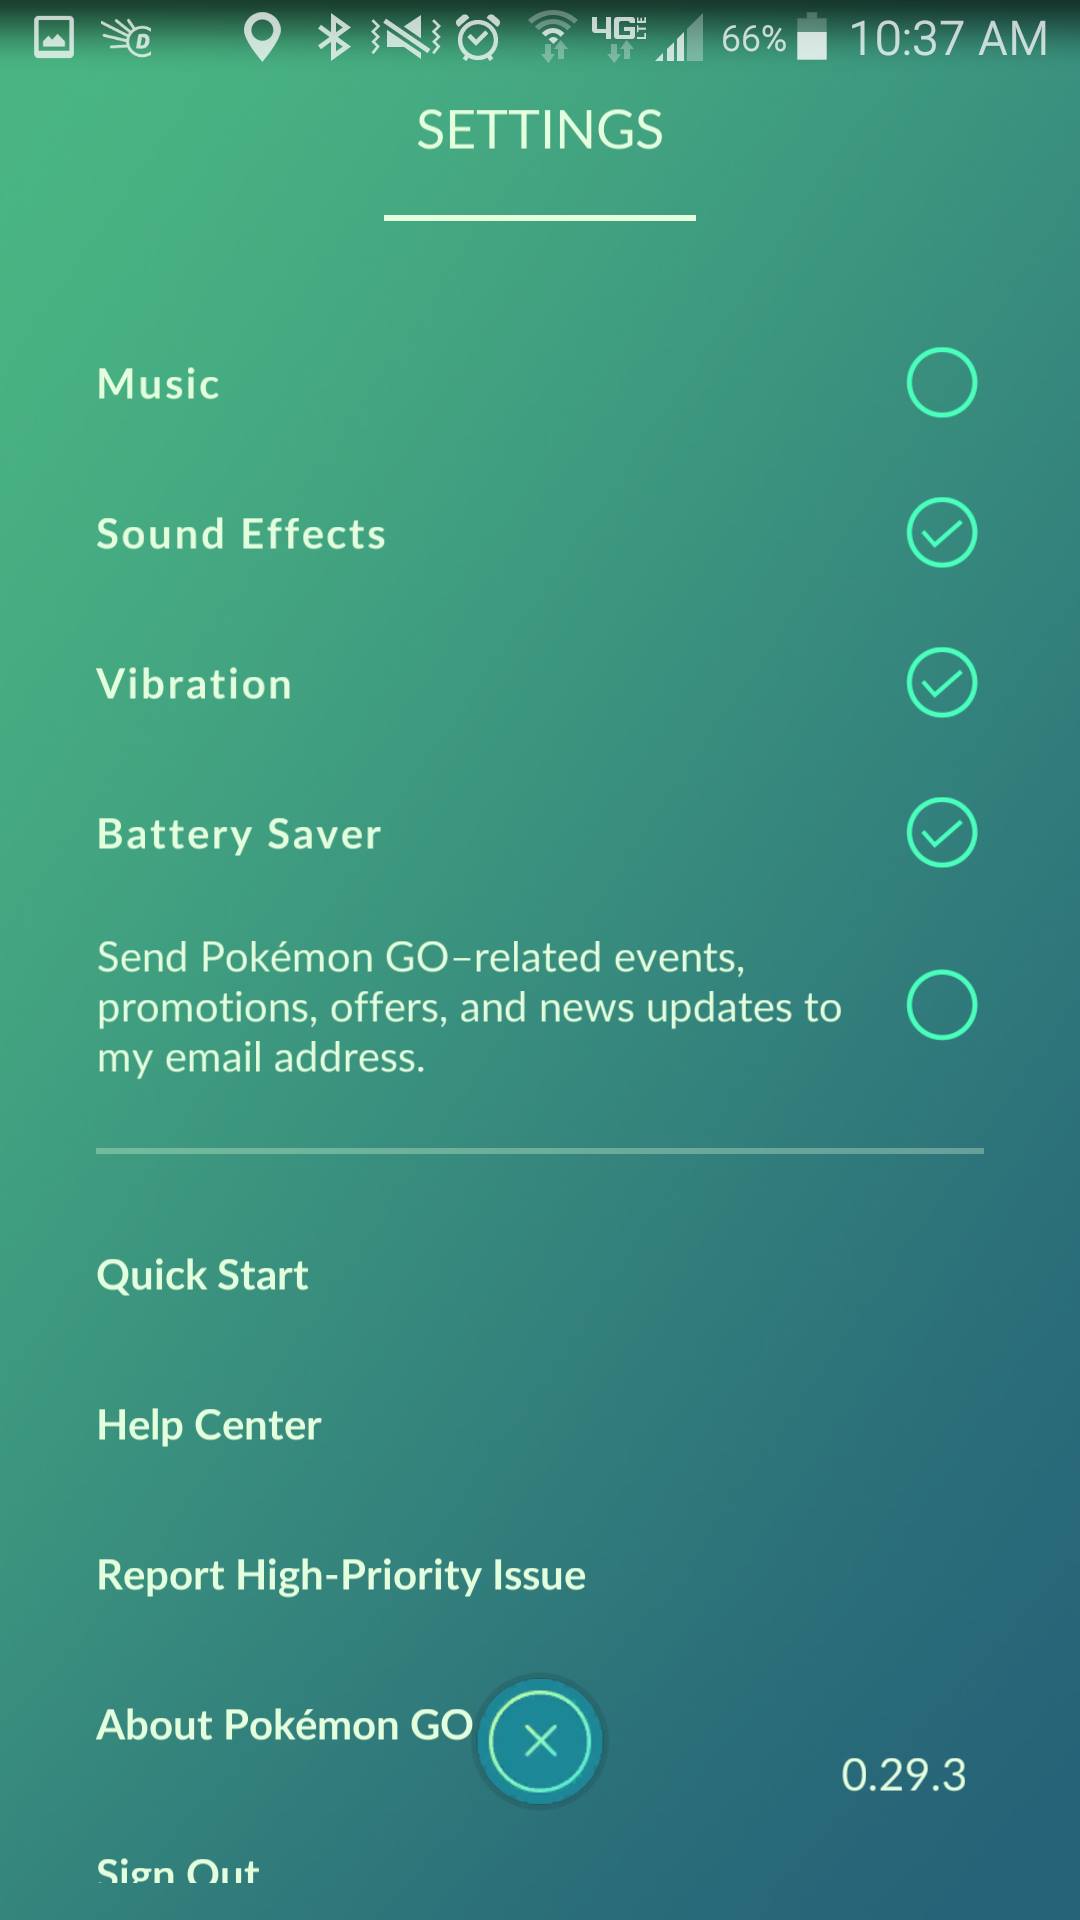
From the Main Menu you can open settings by clicking the cog in the top right. If you'd like to maximize battery life turn off Music and Sound effects and leave Vibration and Battery Saver on. Battery Saver does nothing to your phone to conserve battery, but when you turn your phone upside down the screen will turn to a faint image of the Pokemon Go logo, saving some battery. Your phone will vibrate when a Pokemon is nearby and if you check it every once in a while you shouldn't miss any Pokestops.
How to Play
Luckily playing the game is not too complicated. You can have several goals, taking Gyms, catching every Pokemon, or just to casually catch Pokemon. Whatever your goal is the most important things to do are to check in at Pokestops and to Catch Pokemon.
Farming
It is recommended that you find a well lit public area with plenty of Pokestops and then... just walk in circles to each of them.
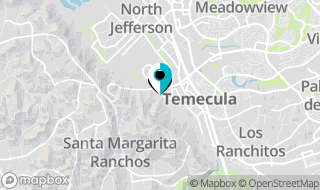
This park is a prime example of the perfect place to farm for Pokemon and Pokestops. However it is easier if you find a larger area such as:
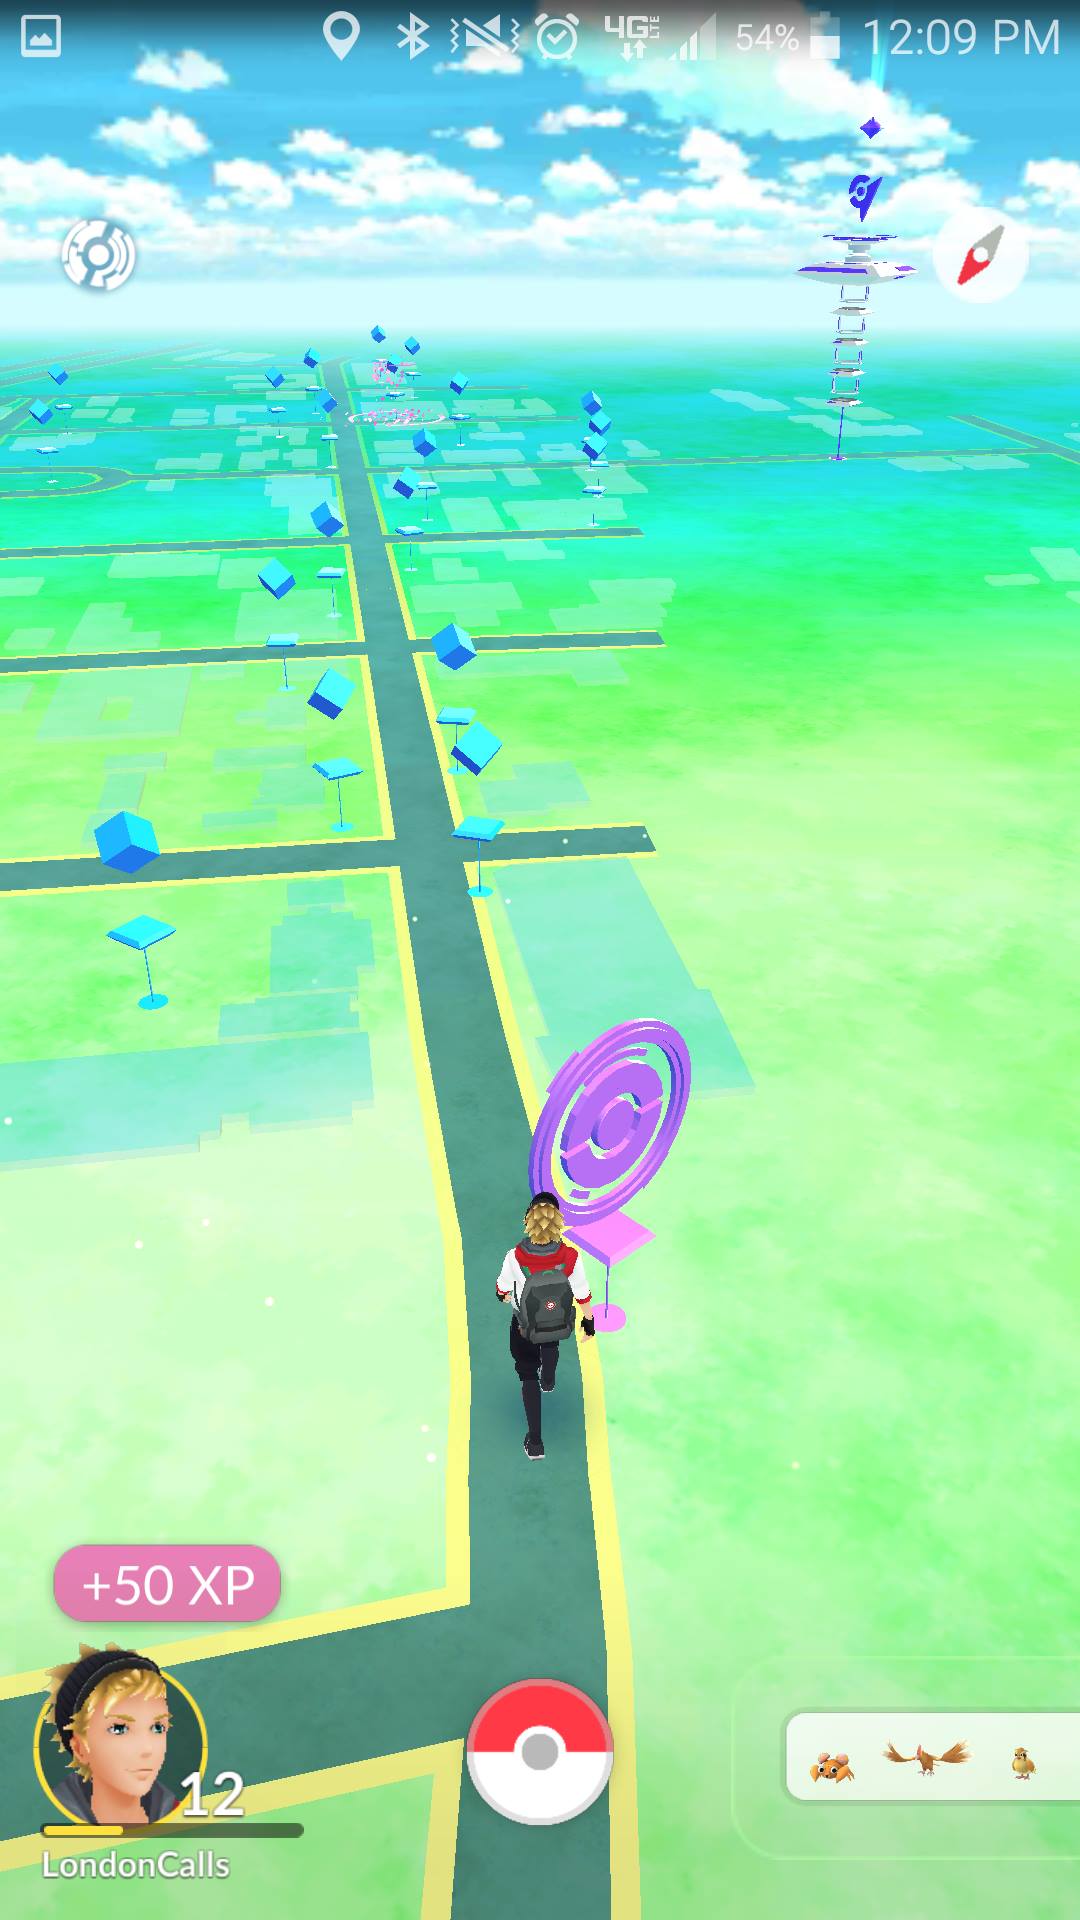
As this location will give you plenty of space to not only find Pokemon, but enough steps to hatch eggs and have Pokemon respawn in areas you've already been when you make a circuit.
Catching a Pokemon
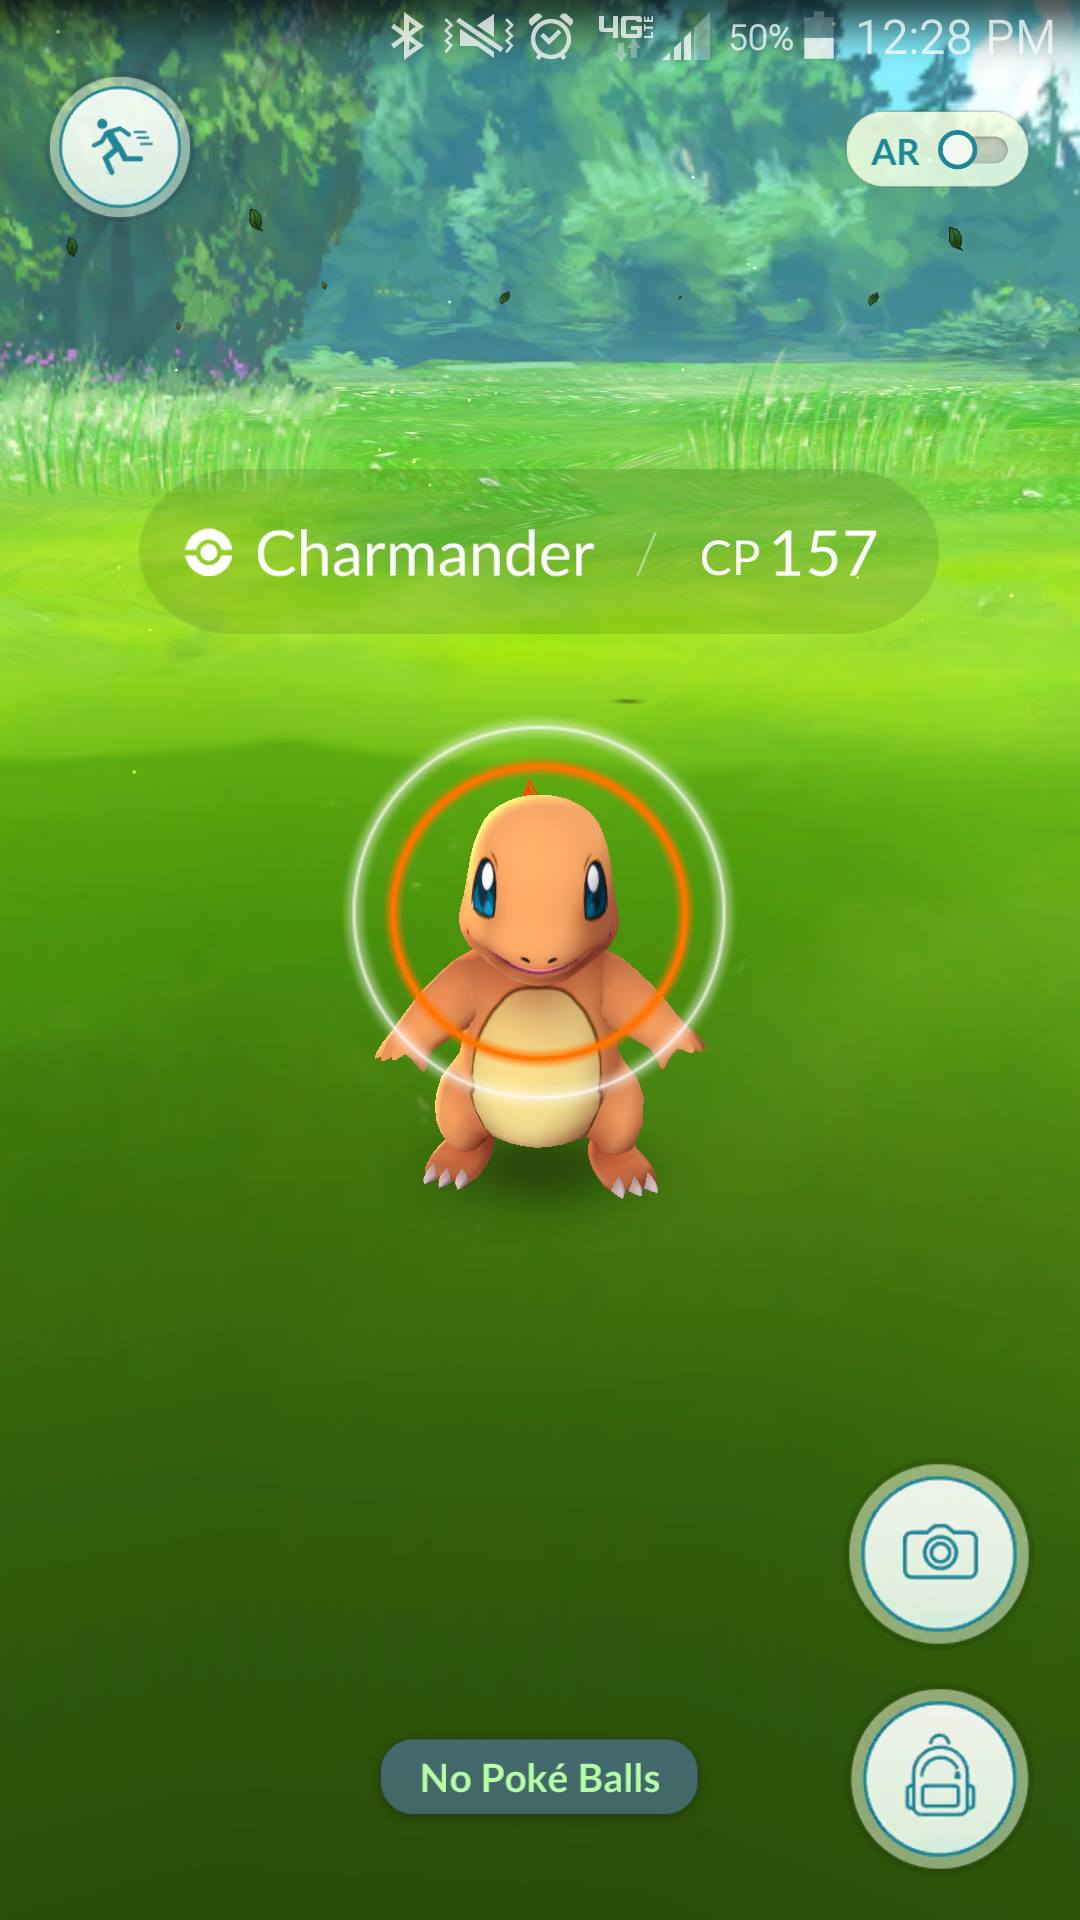
This picture might look strange, that's because I play with AR off to conserve battery, the option is in the top right of the catching screen.
After finding a Pokemon and pulling them up you'll be brought to this menu. There are multiple options when approaching a Pokemon, but the first thing you should note is the CP and the color of the circle. This Charmander has a CP of 157 and an orange circle meaning he isn't just going to sit there and let me throw balls at him. Circles can be any color between Green and Red. Green is the easiest, followed by yellow, then orange, then red. Because this Charmander has a orange circle not only is he more likely to break out of the ball you catch him with, he also has the ability to smack balls away, he can also jump out of the way, curve the balls (you can tell when this happens when the ball you throw has yellow sparkles on it) and he can even simply run away. Because of this it's makes it very difficult to catch the Pokemon. Thankfully there are somethings you can do to help yourself.
The first is using berries, which you unlock around level 5-7. Feeding a pokemon this Berry will make it easier to catch him.
After that you can also curve the ball yourself, spin the ball in small circles and it should have a zipper like animation running around it, once it looks like that you can throw the ball, when you do this the Pokemon can't magically curve it away from itself anymore, some even thing it increases your chance to catch the Pokemon, but there is no evidence supporting that. You also get more exp from doing this.
Another way to increase EXP is to hit the Pokemon with the ball inside the circle, sound confusing? It is. If you think about the Pokemon as a 3-D object, you'd want to hit them square on the nose, or wherever that colored circle is at it's smallest. Many think this also improves your chances of catching the Pokemon as well.
Gym Battles
If you're ready to take on a gym, get stocked up on items and find a shady place to sit down, because you might be there for a while. When attacking a Gym, first pull it open and slide to the right to see how many Pokemon you're going to take down. Note the CP of each one, and what type of Pokemon it is, as that matters. Begin by clicking the battle icon in the bottom right and pick your team of six, using the opponents type to your advantage. To fight, tap your pokemon to attack and swipe to dodge. The blue bar in the top left tells you when you can use your strong attack. To use it hold down on your Pokemon and release. Once you beat the entire gym... do it again! You have to take a gym's prestige level to zero to take it over. A level 9 gym might take a while. Be sure to heal up between battles!
If you're on the same team as the gym, you can spar with the defenders to level up their prestige and get some EXP for yourself, although it is much faster to farm pokestops for EXP.
Eggs
Eggs are items that you can get from Pokestops. There are three types 2km, 5km, 10km. Those are the distances you have to walk to hatch the egg, but you also need The farther the distance, the rarer the Pokemon. There are two types of Incubators, orange infinite use incubators (you start with this) and blue limited incubators (which can be used 3 times). Meaning you can incubate more than one pokemon at a time.
General Tips
- This one might be seen as a bit obvious, but pay attention to your surroundings. The app does a lot of things to make sure you can play without taking all of your attention. If you hit a pole or play while driving and get in an accident it is your fault, not the games. Please pay attention.
- Play with friends! Generally when you're with someone near your level you'll find the same Pokemon and there are often more than when you're alone.
- Use your limited incubators on bigger eggs. Why? Because of their limited uses you get more bang for your buck. Say you have a single 10km egg and five 2km eggs, if you have one blue incubator and one orange incubator, you can hatch 6 eggs, but only use one charge. If you put the unlimited incubator on the 10km egg, you could only hatch 4 eggs before you broke the Blue incubator meaning you'd have to walk an extra 4km for the remaining eggs and would end up without the incubator.
- Save Lucky Eggs and Candy for massive evolutions. Lucky Eggs double your EXP when used, evolution gives 500 exp but is very expensive. Pidgey's are abundant and only cost 12 Candy to evolve, if you save plenty of Pidgey's you can evolve plenty of them to Pidgeotto's while using a single lucky egg, resulting in massive EXP gains.
- If you've just started your character, before catching any pokemon (other than your starter), visit as many Pokestops as possible. As a level 1 you can only get Pokeballs from Pokestops, meaning you can rack up tons of Pokeballs early on which will carry you through the rest of the game.